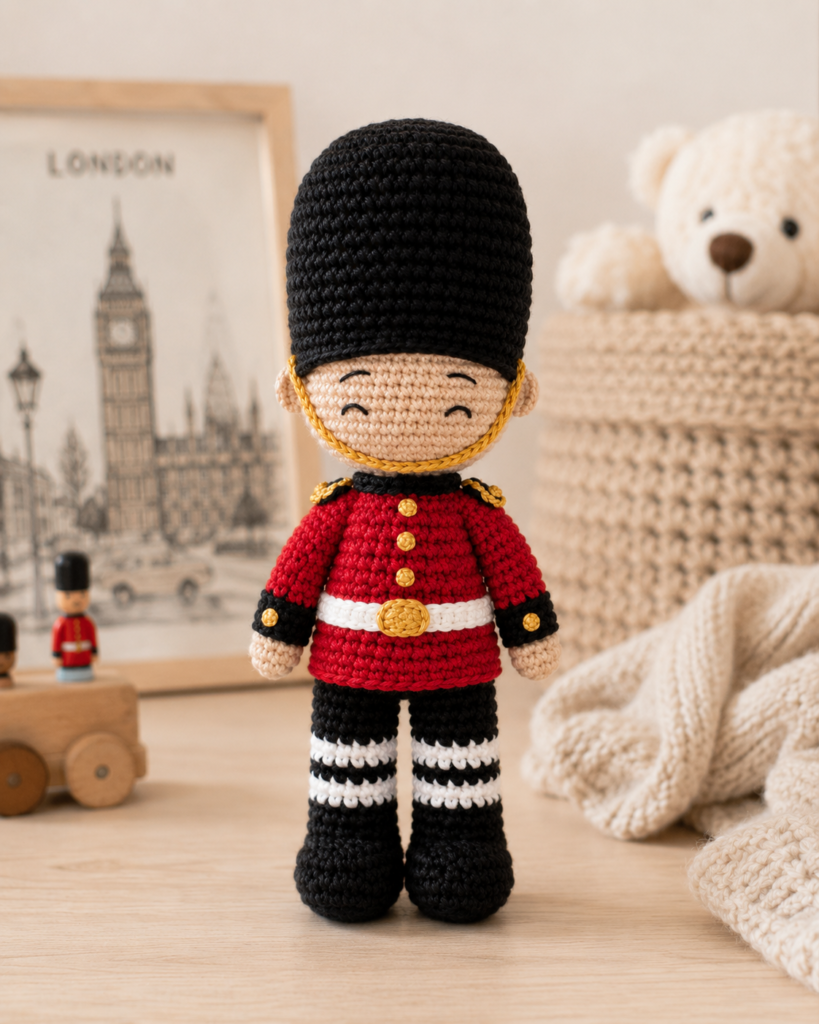
Henry the Guard Crochet Pattern – Adorable Amigurumi Toy Tutorial
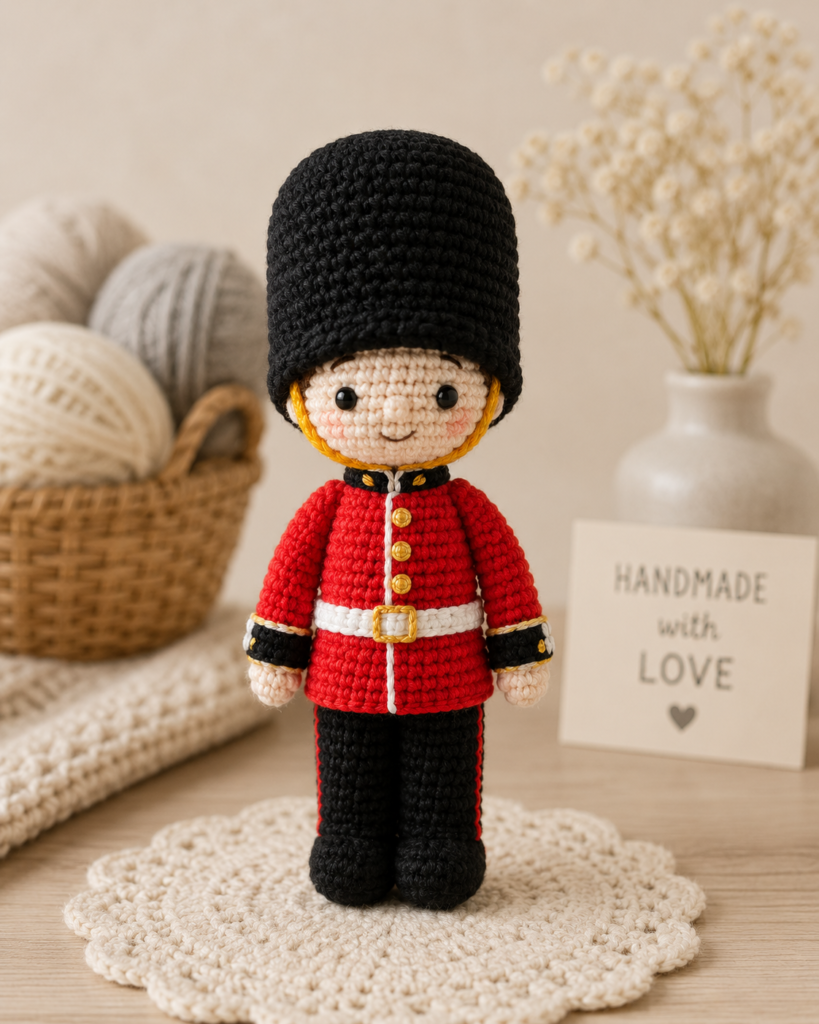
If you love making unique amigurumi characters, this Henry the Guard crochet pattern is the perfect project for your next crochet session. This adorable handmade guard doll features detailed boots, a classic red uniform, fluffy shoulder puffs, and a charming sleepy-eyed expression that makes it stand out in any crochet collection.
This beginner-friendly to intermediate crochet tutorial walks you through every important step, from creating the head and facial features to assembling the final doll. Whether you’re creating gifts, nursery décor, or Pinterest-worthy crochet toys, this pattern is packed with creative inspiration.
Materials Needed for the Henry the Guard Amigurumi
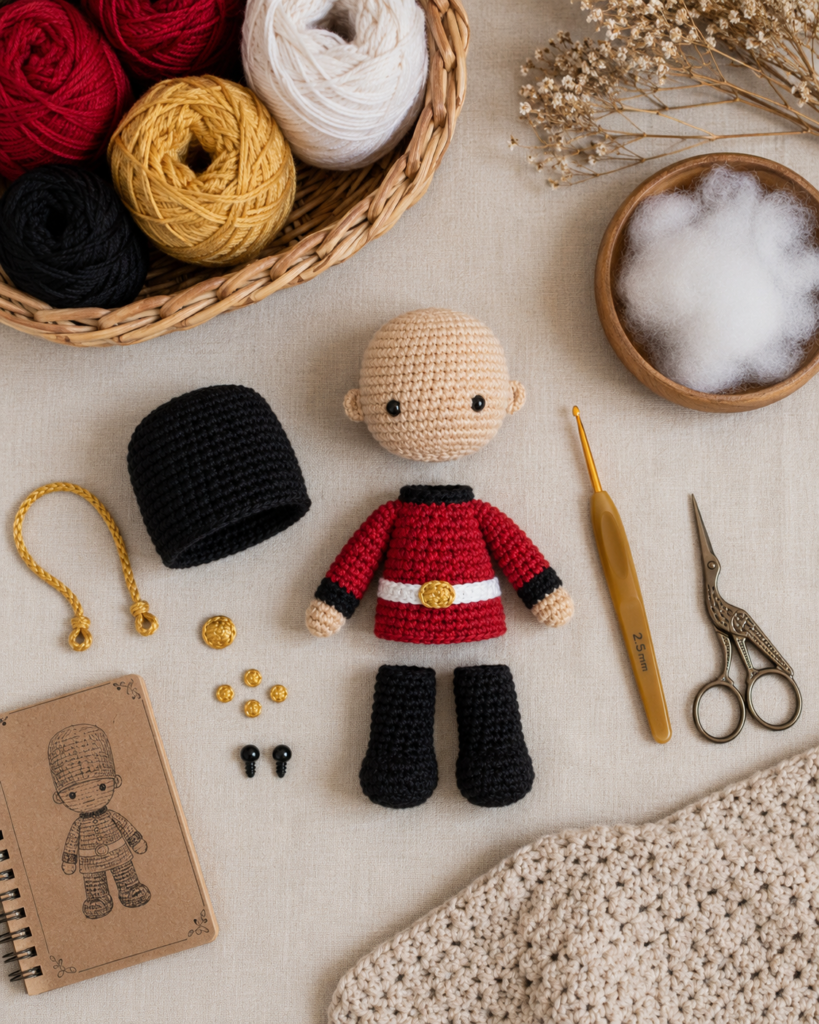
Before starting this crochet guard doll, gather all your supplies to make the process smooth and enjoyable. The pattern uses simple materials that most crocheters already have in their craft collection.
You’ll need white, red, black, mustard, and orange yarn, along with a 3.0 mm crochet hook, safety eyes, stuffing fiberfill, embroidery needles, and stitch markers. These materials help create the toy’s realistic details and polished finish.
Crochet Supplies List
- 3.0 mm crochet hook
- Fiberfill stuffing
- 9 mm safety eyes
- Black and white embroidery thread
- Stitch markers and scissors
- Red, white, black, mustard, and orange yarn
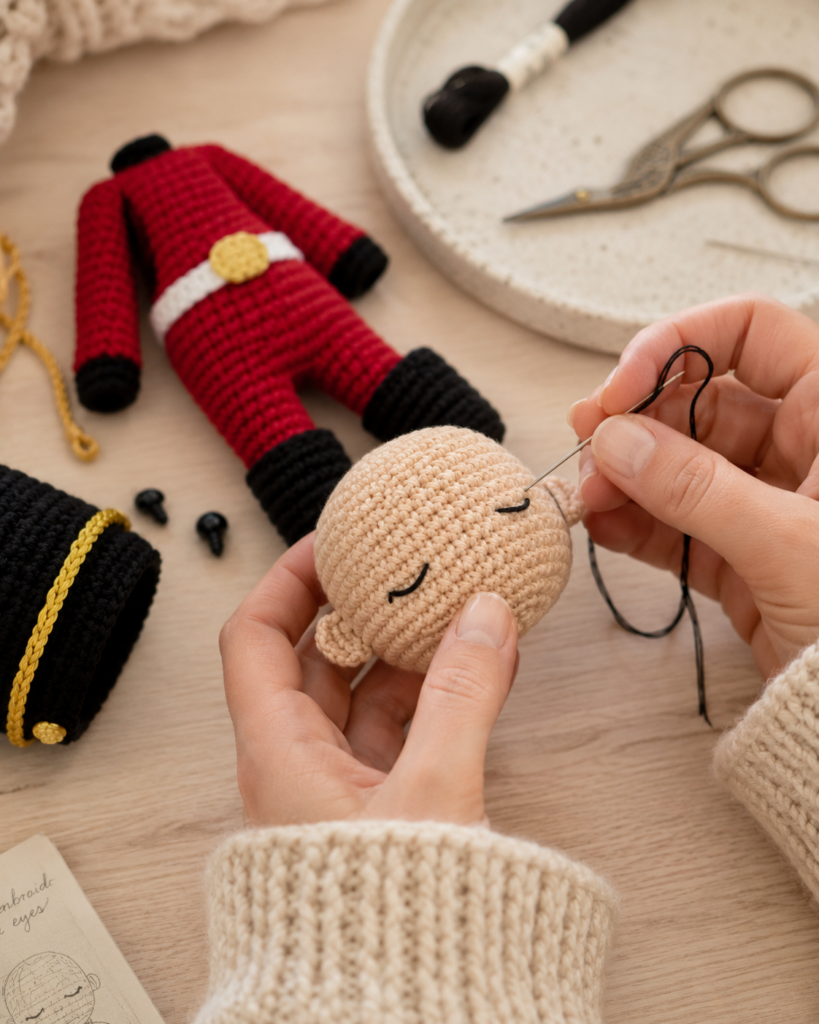
How to Crochet the Head and Facial Features
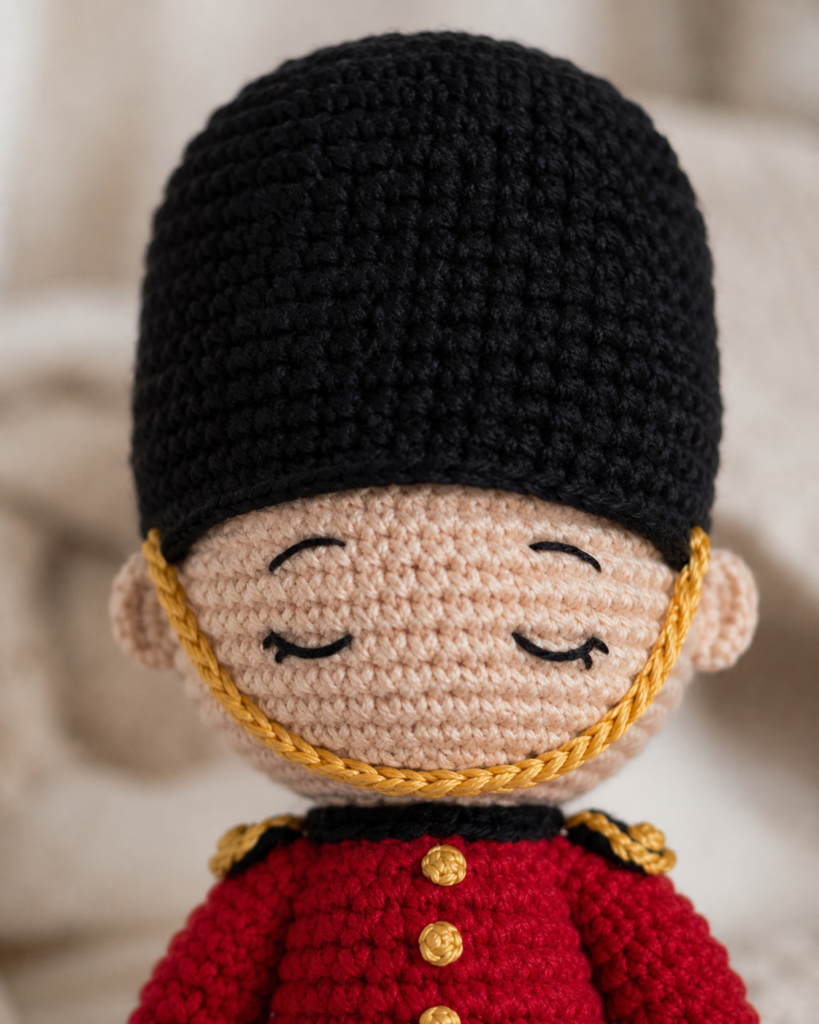
The head is worked in continuous rounds using white yarn and gradually increases to form a smooth round shape. The safety eyes are placed between rounds 15 and 16 with eight stitches between them for the doll’s signature sleepy expression.
To create more personality, the pattern includes embroidered eyebrows, lazy eyelids, and detailed mouth shaping. These tiny touches bring the crochet guard character to life and make the finished toy look professional and expressive.
Tips for Perfect Amigurumi Faces
- Use stitch markers to track rounds accurately
- Stuff the head firmly for better shape retention
- Slightly indent the eyes for a realistic appearance
- Embroider eyebrows carefully for added personality
Creating the Nose, Mouth, and Embroidered Details
The crochet nose is made separately using orange yarn and sewn onto the face between rounds 14 and 18. The mouth can be customized with black embroidery thread to give Henry a playful or serious expression depending on your style.
If you prefer embroidered eyes instead of safety eyes, the pattern also explains how to create lashes, eye highlights, and brows using black and white thread. This is a fantastic option for baby-safe crochet toys.
Crochet the Arms, Legs, and Boots
One of the cutest parts of this crochet pattern is the detailed guard uniform. The legs feature striped black-and-white sections with realistic boots, while the arms include decorative cuffs and red sleeves.
The boots are crocheted directly onto the legs, making assembly easier and creating a seamless look. The pattern also includes shoulder puffs that give the character an authentic royal guard appearance.
Helpful Crochet Tips
- Stuff the feet firmly for stability
- Keep color changes neat for clean stripes
- Use tight stitches to avoid stuffing gaps
- Flatten pieces before sewing for easier assembly

How to Make the Body, Belt, and Hat
The body is crocheted in black and red yarn to resemble a traditional royal guard uniform. The pattern includes a detailed coat flap, black collar, white belt, and mustard-colored buckle for extra realism.
The hat is slightly stuffed to maintain its shape and finishes the toy beautifully. Once assembled, Henry becomes a stunning display piece for crochet lovers or handmade gift buyers.
Why Crocheters Love This Pattern
- Unique character design
- Great for gifting and selling at craft fairs
- Pinterest-friendly aesthetic
- Beginner-intermediate skill level
- Easy customization options
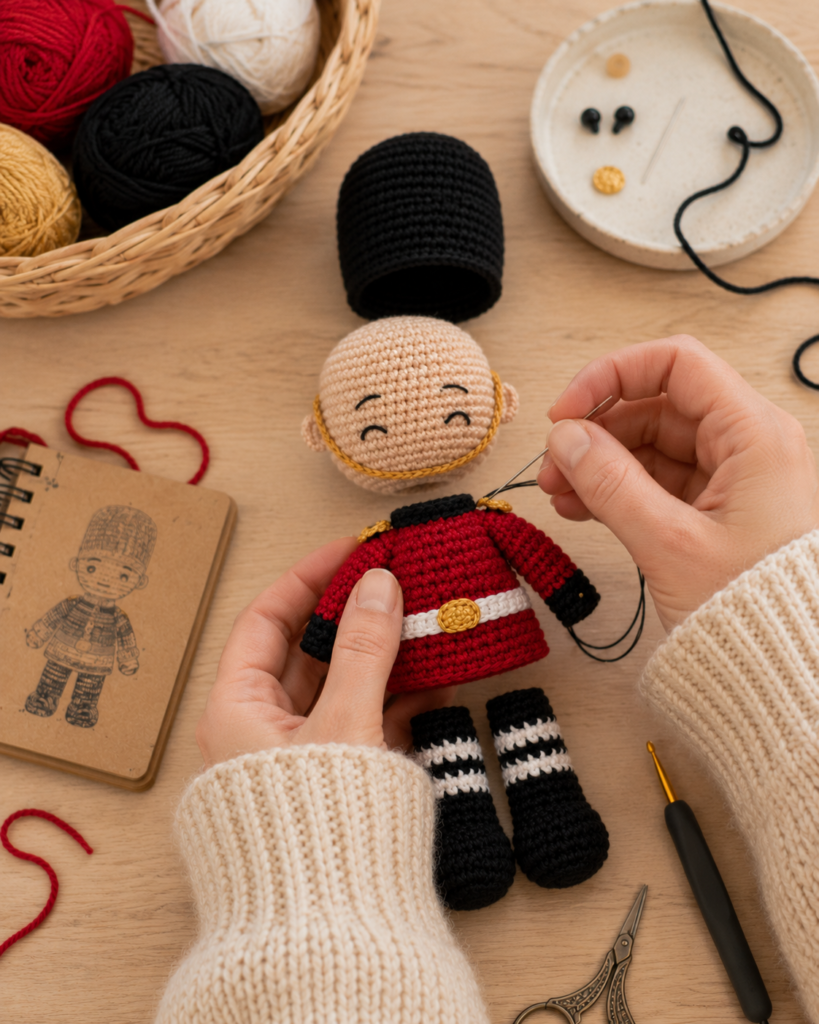
Final Assembly and Finishing Touches
The final assembly stage brings all the pieces together into one adorable crochet character. The head, arms, legs, and decorative puffs are sewn securely onto the body, while the belt and coat details complete the polished look.
Take your time positioning the parts evenly before sewing permanently. Small adjustments can make a huge difference in the final appearance of your amigurumi guard doll.
Assembly Checklist
- Attach head securely to stuffed body
- Align arms slightly forward
- Position legs evenly for balance
- Add belt before sewing final details
- Shape hat neatly before attaching
Why This Crochet Guard Pattern Is Perfect for Pinterest
Cute amigurumi dolls consistently perform well on Pinterest because they combine handmade charm with collectible appeal. This Henry the Guard crochet pattern is ideal for:
- Crochet Pinterest boards
- Handmade gift inspiration
- Nursery décor ideas
- Amigurumi collector projects
- Seasonal craft content
Adding high-quality vertical images and Pinterest-friendly graphics can help this crochet article attract long-term organic traffic from both Google and Pinterest searches.
Conclusion
This Henry the Guard crochet pattern is a fun and rewarding amigurumi project packed with charming details and beginner-friendly techniques. From the sleepy embroidered eyes to the tiny guard boots and fluffy shoulder puffs, every part of this crochet doll is designed to stand out.
If you enjoy making cute crochet toys and collectible amigurumi characters, this pattern deserves a place in your handmade collection. Don’t forget to download the full PDF pattern and save this tutorial to your favorite Pinterest crochet board for later inspiration.