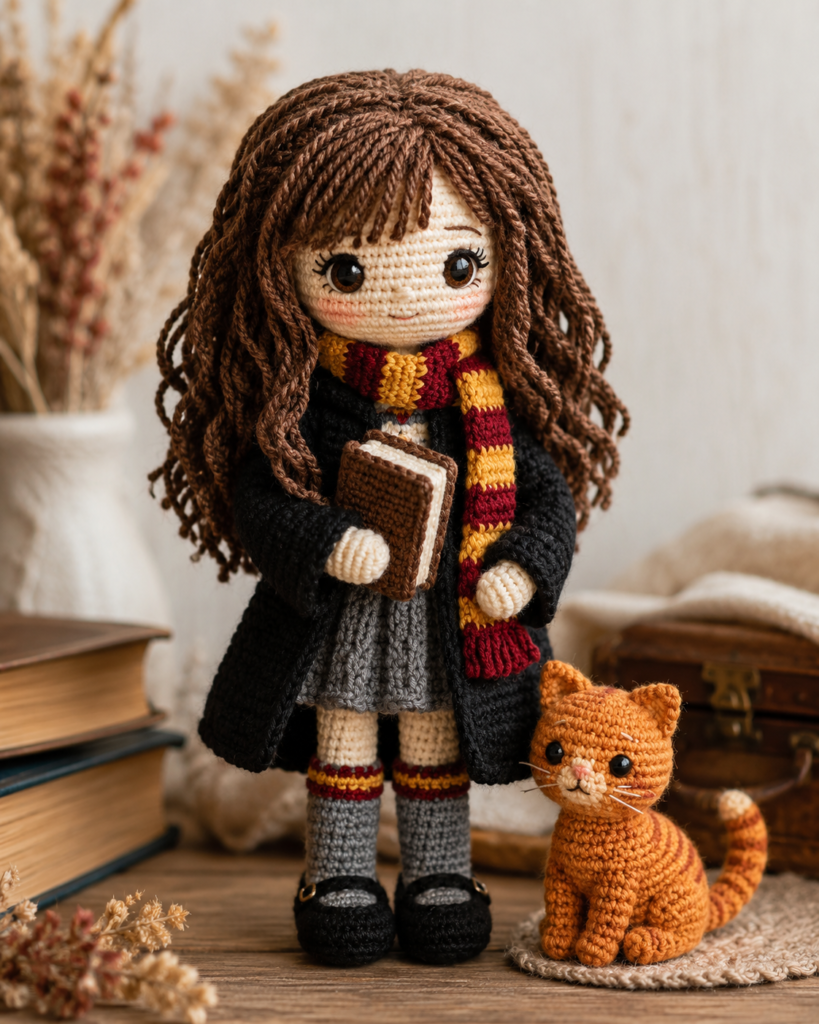
Hermione Granger Crochet Pattern: Make a 9-Inch Witch Girl Amigurumi Doll with Crookshanks
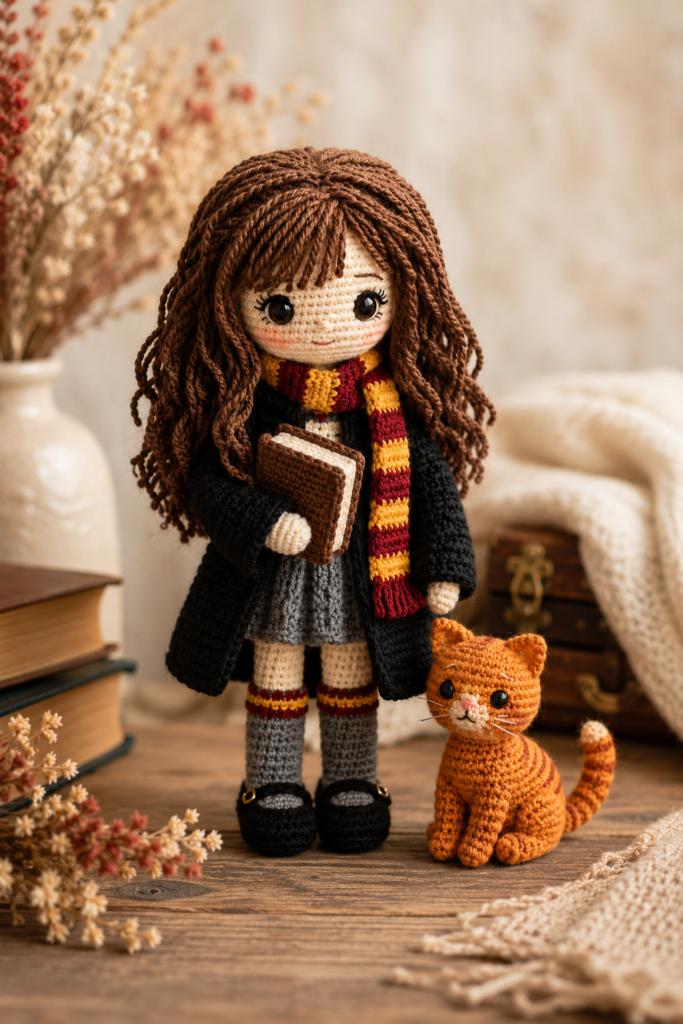
If you love character-inspired amigurumi, this Hermione Granger crochet pattern is a magical project to add to your handmade collection. This detailed witch girl crochet doll measures about 9 inches / 22.5 cm, with a tiny Crookshanks-inspired orange cat measuring about 2.6 inches / 6.5 cm, making it a beautiful display piece, gift, or keepsake for fantasy-loving crafters.
This project is designed for mixed skill levels. Beginners can follow the structure step by step, while experienced crocheters will enjoy the neat shaping, clean color changes, surface crochet details, embroidered face, layered hairpiece, Gryffindor-style robe, scarf, book accessory, and miniature cat companion.
Create a Hermione Granger Crochet Doll with Magical Handmade Details
This crochet doll pattern combines classic amigurumi construction with small character details that make the finished piece instantly recognizable. The doll includes a grey school outfit, red and yellow necktie, black robe, striped scarf, brown hair with bangs, embroidered facial features, and a tiny handmade book.
Most of the doll is worked in continuous rounds, which helps create a smooth amigurumi finish without visible seams. A stitch marker is especially helpful here, because the pattern uses shaping, color changes, and joined body parts that need careful round tracking.
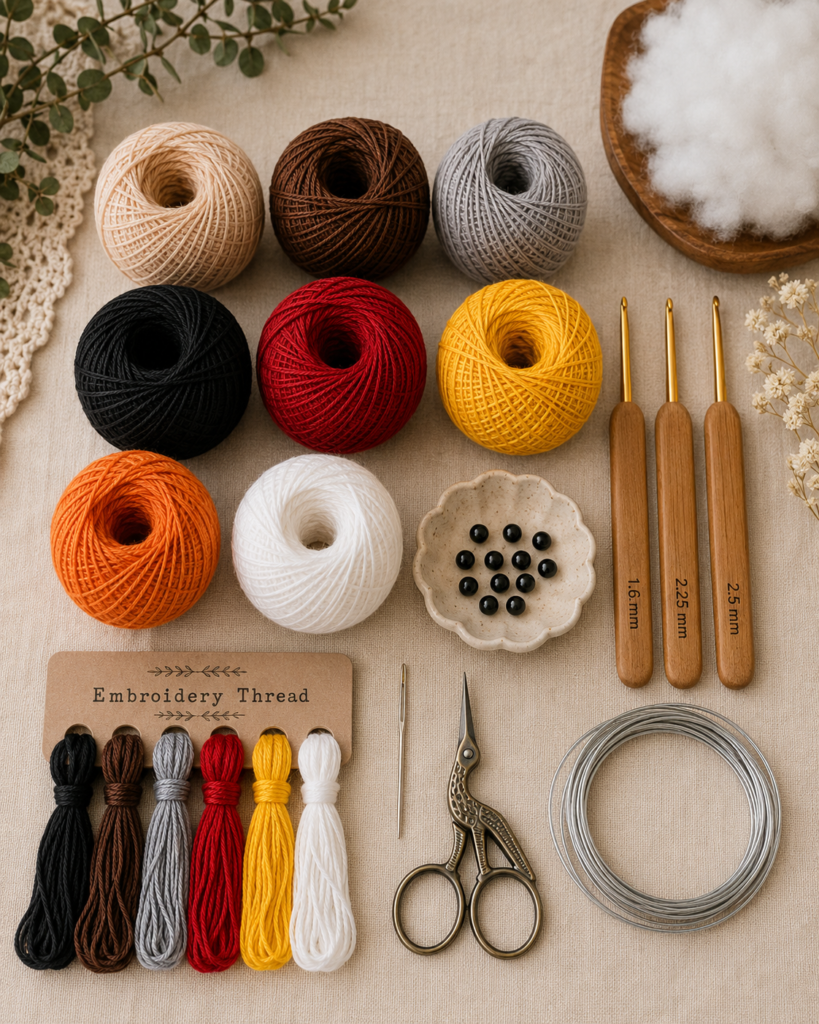
Gather the Right Materials Before You Start Crocheting
For the cleanest result, the PDF recommends cotton fingering weight yarn in white, skin, yellow, orange, red, grey, dark grey, brown, dark brown, and black. These colors build the full outfit, hair, robe, scarf, shoes, accessories, and Crookshanks.
You will also need 1.6 mm, 2.25 mm, and 2.5 mm crochet hooks, plus embroidery thread in yellow, red, brown, and black. The face uses black half beads for the eyes, while polyester fiberfill, scissors, glue, a sewing needle, and soft wire help with shaping and finishing.
Helpful Supplies for a Neater Amigurumi Finish
A smaller hook and tight tension are important for this project because the doll is firmly stuffed. Tight stitches help prevent small holes, especially around the head, body, legs, and Crookshanks.
The pattern also recommends using invisible decreases instead of normal decreases. This small technique makes a big difference in amigurumi because it keeps the shaping smoother and reduces visible gaps.
Start with the Doll Base: Arms, Legs, Body, and Head
The Hermione crochet doll begins with small shaped arms, including a puff stitch detail for the hand. The inner neck is made separately, stuffed firmly, and later inserted into the body to support the head neatly.
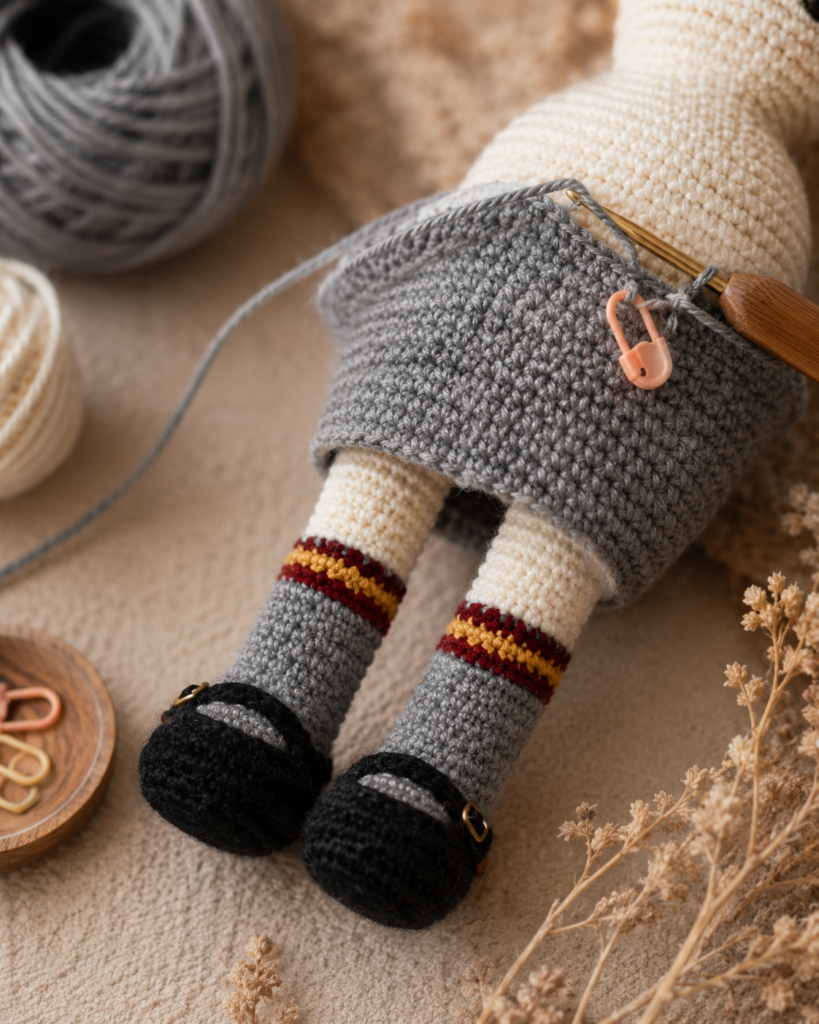
The legs and body are worked from the shoes upward, using black, grey, skin, white, and outfit colors. Both legs are joined with chain stitches before the body continues upward, which is a common amigurumi doll technique for creating a seamless standing shape.
Use Continuous Rounds and Tight Tension for a Professional Look
Because the body and head are worked in continuous rounds, it is important to mark the last stitch of each round. This helps keep the shaping even, especially when changing colors or joining the arms to the body.
The head is built directly above the body using increases and decreases, then stuffed firmly before closing. Firm stuffing helps the finished doll keep its rounded shape and gives the face a smooth surface for embroidery.
Add the School Uniform Details with Surface Crochet
One of the most charming parts of this pattern is the school uniform detail. The shirt collar is made before the head is completed, using a 1.6 mm crochet hook and embroidery thread for fine surface crochet.
Yellow embroidery thread is worked around the white shirt section first, followed by red thread underneath it. This creates the neat layered collar trim, and the red yarn necktie is finished with yellow thread stitched over it for the classic striped look.
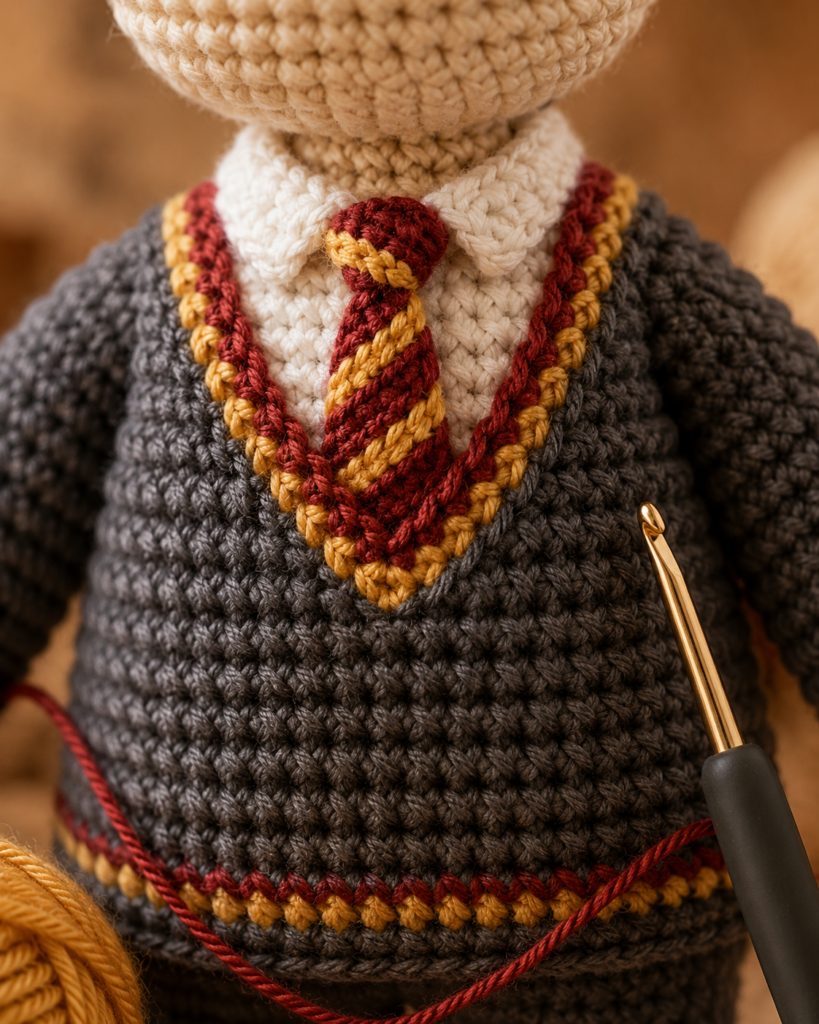
Why Surface Crochet Makes the Outfit Stand Out
Surface crochet adds clean lines without needing to sew on bulky pieces. It is especially useful for small doll outfits because it gives color contrast while keeping the fabric flat and tidy.
Experienced crocheters can use this section to practice precision finishing. Beginners can take it slowly, placing the thread carefully between rows and checking the front of the doll often.
Crochet the Skirt, Gryffindor-Style Robe, and Striped Scarf
The skirt is made separately in dark grey yarn, using back loop work to create a textured ribbed look. It is then sewn onto the body and finished with surface crochet details in yellow and grey.
The black robe is another standout part of the pattern. It uses half double crochet, double crochet, treble crochet, increases, sleeve shaping, and a small black bead closure to create a dramatic wizard-style layer.
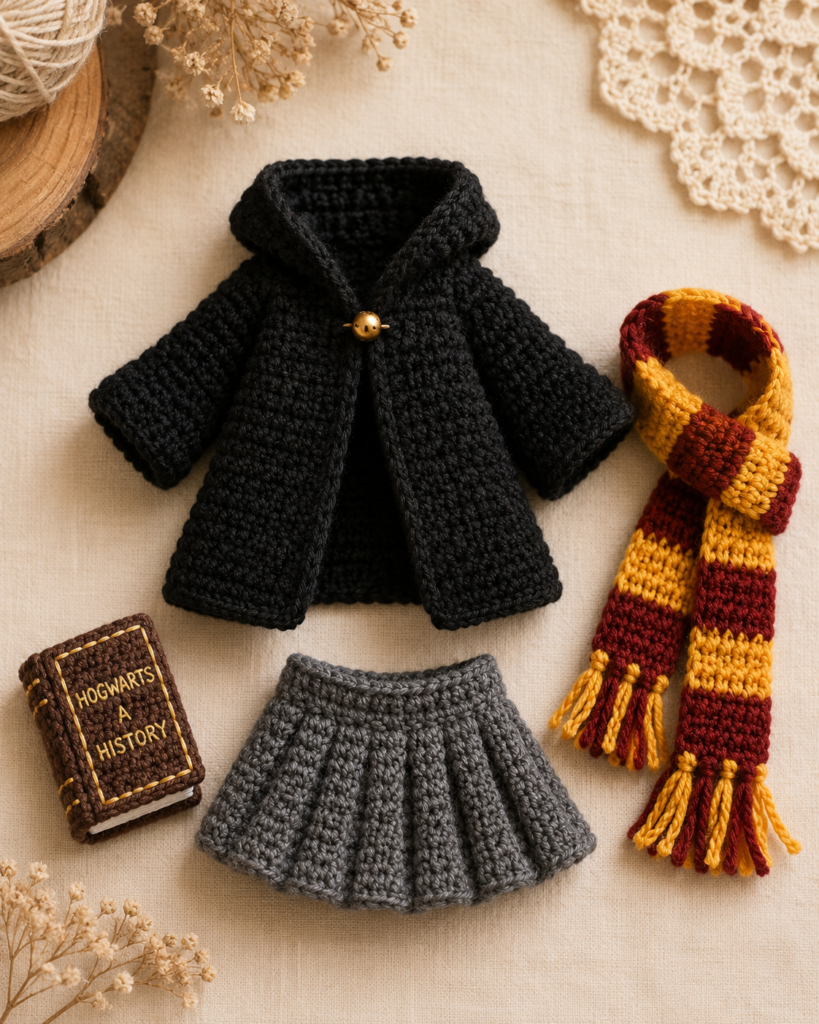
Make the Striped Scarf with Tassels
The scarf is crocheted in red and yellow stripes, repeating the color pattern until it reaches 50 rounds with 25 stripes. Small tassels are added to both ends, giving the finished doll a cozy handmade look.
This is a great section for confident beginners because the scarf is simple in shape but high in visual impact. It also creates a natural Pinterest-friendly photo moment because the colors stand out beautifully against the black robe.
Shape the Brown Crochet Hairpiece with Layered Strands
The hairpiece is one of the most detailed parts of the Hermione Granger crochet pattern. It begins with a small circular cap, then individual strands are worked from the hairpiece to create long hair, side pieces, and bangs.
The first round includes 28 hair strands, while the second round adds 8 more strands for extra fullness. Before gluing, the PDF recommends arranging and pinning every strand in place so the hair sits neatly around the ears, forehead, and back of the head.
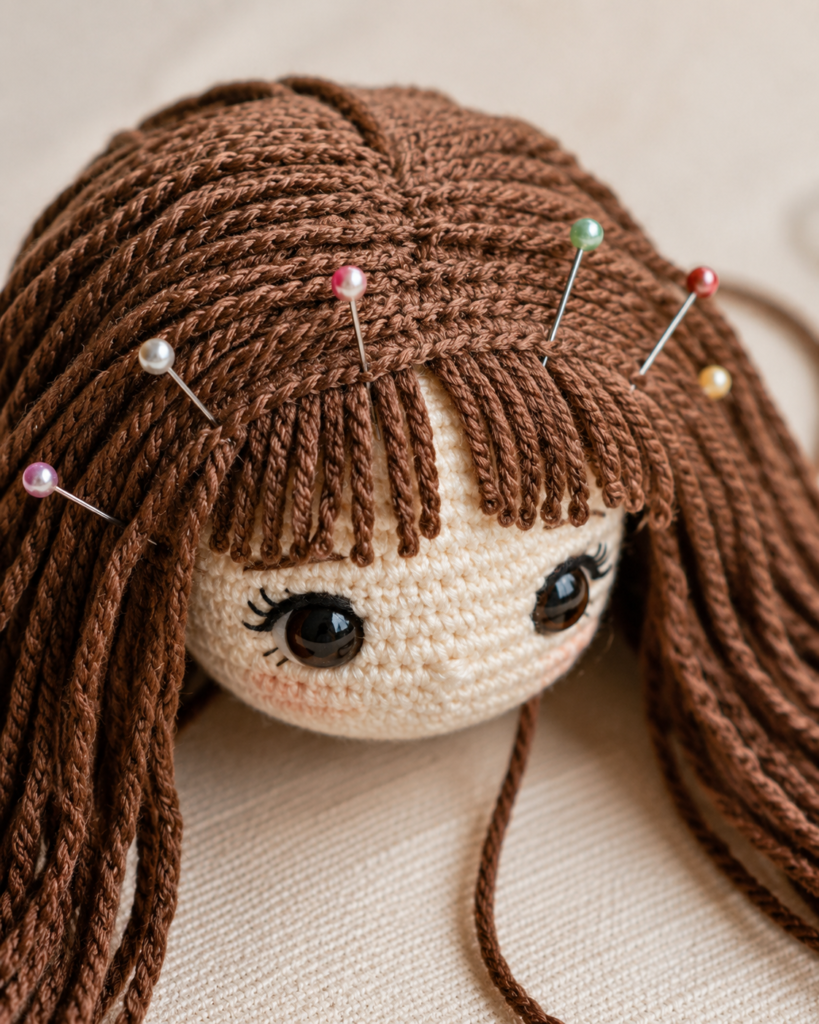
Tips for Clean Crochet Doll Hair
Take your time with the hair placement. The bangs should sit around eyebrow level, while the longer strands should frame the face and cover the back of the head evenly.
For a more polished result, pin everything first, then glue the strands one by one. This prevents uneven spacing and gives the finished doll that soft, rounded character look.
Embroider the Face for a Soft Handmade Expression
The face uses eye indentations, black half beads, white yarn around the eyes, black embroidery thread for eye lines and lashes, orange-brown thread for eyebrows, and skin yarn for the nose. These small details bring the character to life without making the face feel too busy.
The PDF places the eyes with a 10-stitch space between them, while the eyelashes and eyebrows are embroidered around the eye area. The ears are sewn to the sides of the head, and pink blush is added to both cheeks for a gentle finish.
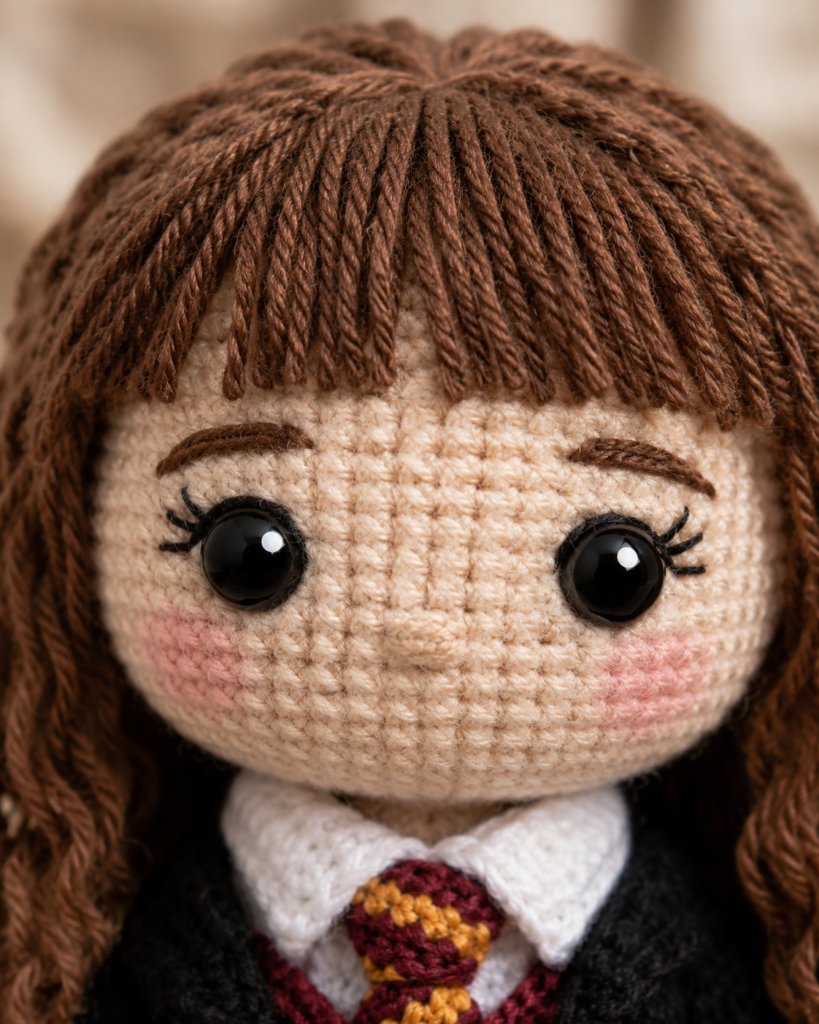
Face Details Beginners Should Not Rush
Embroidery can feel intimidating, but it is one of the most rewarding parts of amigurumi. Use light guide marks, keep your thread tension even, and check both sides of the face before knotting.
Experienced makers may enjoy refining the expression with slightly angled eyebrows, balanced lashes, or subtle blush placement. Small changes can make the finished doll look more curious, sweet, or playful.
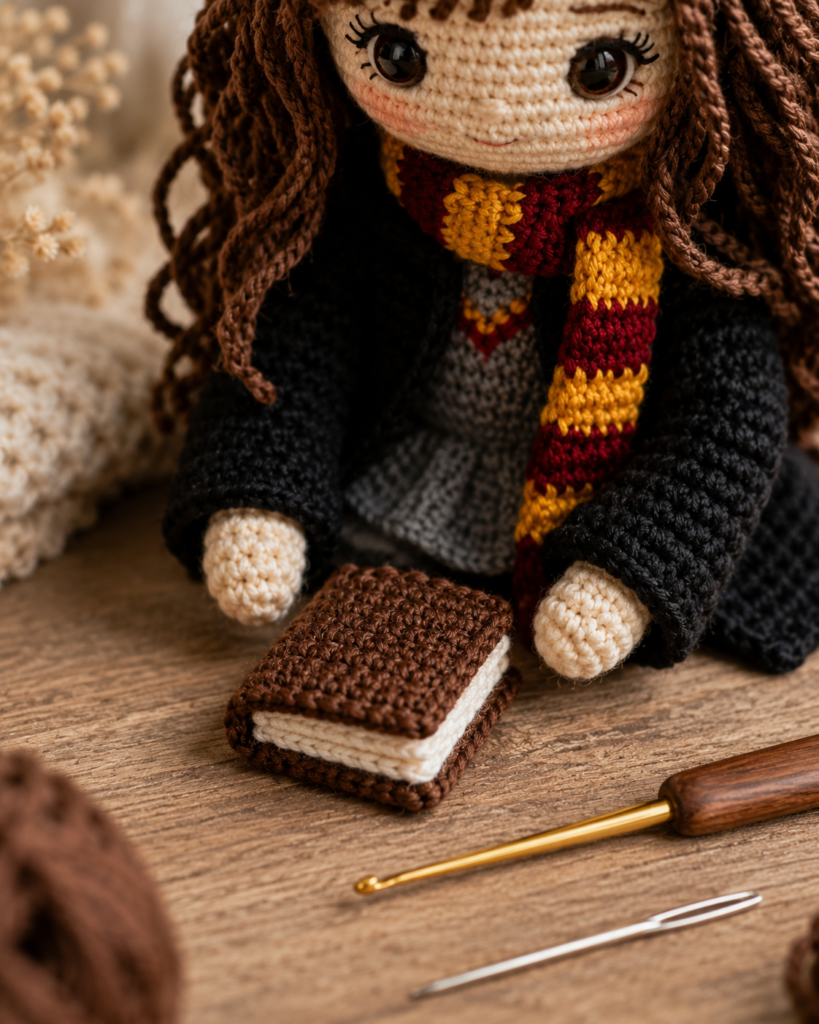
Make the Tiny Crochet Book Accessory
The book accessory is a small but memorable part of the design. The pages are crocheted in white yarn, while the cover is made in dark brown yarn and folded around the pages.
This tiny book adds storytelling to the finished doll and makes the project feel complete. It is also a lovely detail for staged photos, gift packaging, and Pinterest pins.
Crochet Crookshanks, the Little Orange Cat Companion
The pattern also includes a miniature orange cat inspired by Crookshanks. This tiny companion is made with orange yarn and includes a head, ears, front legs, body, back legs, and tail.
Crookshanks uses similar amigurumi techniques to the doll, including continuous rounds, invisible decreases, eye indentations, bead eyes, embroidered features, and firm stuffing. The tail is shaped with soft wire and bent into an “S” curve for extra character.
Small Amigurumi Details That Make Crookshanks Stand
The cat’s bottom indentation helps it sit or stand more easily. This finishing detail is especially useful for miniature amigurumi because tiny shapes can become rounded and unstable without careful shaping.
The face is embroidered with dark brown, white, orange, and pink details, making the tiny orange cat expressive despite its small size. It is the perfect companion piece for the finished Hermione doll.
Skill Level: Can Beginners Make This Hermione Crochet Pattern?
This pattern is best for confident beginners through experienced crocheters. You should be comfortable with magic rings, single crochet, increases, invisible decreases, half double crochet, double crochet, treble crochet, slip stitches, front loop only, back loop only, and sewing parts together.
That said, the techniques are approachable when taken one section at a time. Beginners can treat the doll as a learning project, while advanced crocheters can focus on clean finishing, tight tension, surface crochet, half-color changes, and detailed embroidery.
Techniques You Will Practice
- Continuous rounds with stitch markers
- Tight amigurumi tension
- Invisible decrease shaping
- Half-color change for cleaner color transitions
- Puff stitch details
- Surface crochet for collar and outfit trim
- BLO and FLO texture work
- Joining legs and arms into the body
- Embroidered eyes, nose, eyebrows, and lashes
- Layered crochet hair strand placement
- Wire-shaped tail for a tiny cat accessory
[PDF Download Button]
Final Thoughts: Download the Hermione Granger Crochet Pattern PDF
This Hermione Granger crochet pattern is more than a simple doll project. It is a detailed amigurumi tutorial with a 9-inch witch girl doll, a Gryffindor-style robe, a striped scarf, a tiny book, embroidered facial details, layered brown hair, and a miniature Crookshanks-inspired orange cat.
Whether you are making it as a handmade gift, a collectible crochet doll, or a personal amigurumi challenge, the full PDF gives you the step-by-step structure needed to complete every piece with confidence.
Download the full PDF pattern, gather your cotton yarn and hooks, and start creating your own magical crochet doll today.